

One of my friends asks me about creating and using contact “groups” in Outlook 2007. There are four ways to work with groups of contacts.
In Outlook 2007 there is a Navigation Pane (the accordion type control on the left hand side of outlook program window). It has things like Mail, Contact, Calendar tabs and Tasks. Creating your own Groups of email addresses is a handy function, as it allows you to send email to a pre-defined collection of people easily, without having to remember their names or email addresses. By expanding the contacts tab you can create.

· Group Individual contacts into folders.
· Add groups of contacts to the Outlook Address Book
· Create and e-mail distribution list
· Create an Outlook contact group
Group individual contacts into folders
You can use contact folders to organize groups of related contacts to save your ton of time in the long run. You can use Contact Groups to quickly send e-mails to:
• All employees in the same department or organization
• Members on the same project or committee
• A group of friends
There are distribution lists in the Global Address List as well. Lists in the Global Address List are available to all users. The distribution lists you build in your Contacts Address Book are only available to you.
Step 1: Create a new contact folder
- In Contacts, on the File menu, point to New, and then click Folder.
- In the Name box, type a name for the new folder.
- Verify that Contact Items appears in the Folder contains box, or choose it from the list.
- Under Select where to place the folder, click where you want to place the folder.
- Click OK.

Step 2: Add contacts to the new folder
· To move the contact (this removes the contact from its current folder)
1. Click Cut to move the contact to the new folder in the Navigation Pane.
2. Click the new folder, and then on the Edit menu, click Paste.
· To copy the contact
1. Click Copy to move the contact to the new folder in the Navigation Pane.
2. Click the new folder, and then on the Edit menu, click Paste.
Add groups of contacts to the Outlook Address Book
The Outlook Address Book can store the contact details of everyone you know. Not only is this useful as a reference tool, but it also means you can easily enter any stored email address into an email message without having to type it manually. Your contact folders, by default, are automatically available to you in your Outlook Address Book as well. Each contact folder appears as an address book within the main Outlook Address Book.
Step 1: Add a contact group to the address book
- On the Tools menu, click Account Settings.
- On the Address Books tab, click New.
- When you are prompted, click Additional Address Books, and then click Next.
- Click the address book that you want to add, and then click Next.
You must exit and restart Outlook to use the address book that you added.
Step 2: Display the contact group in the Address Book
When you open the Address Book for the first time, the default address book is displayed. (If you have a Microsoft Exchange account, the default address book is usually your Global Address List.) To change the contacts displayed in the Address Book, you must select their group from the Address Book list.
· In the Address Book, in the box under Address Book, click the contact group.

Send a message to a group of contacts (create an e-mail distribution list)
If you frequently email the same group of recipients, a distribution list can be a real time saver. Instead of having to add each individual contact one-at-a-time, you can simply add the distribution list to your email and you have included all of those contacts in one step.
Create a distribution list by using names in your Address Book
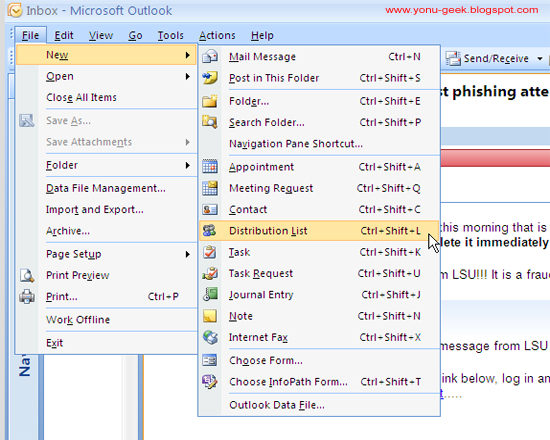
1. On the File menu, point to New, and then click Distribution List.
2. In the Name box, type a name.
3. On the Distribution List tab, click Select Members.
4. In the Address Book drop-down list, click the address book that contains the e-mail addresses you want in your distribution list.
5. In the Search box, type a name that you want to include. In the list below, click the name, and then click Members. Do this for each person whom you want to add to the distribution list, and then click OK.
If you want to include a longer description of the distribution list, on the Distribution List tab, click Notes, and then add it. The distribution list is saved in your Contacts folder by the name that you give it.
Create an Outlook contact group
Once you organize individual contacts into folders, you can organize your related contact folders into groups in Navigation Pane (Navigation Pane: The column on the left side of the Outlook window that includes buttons for the Mail, Calendar, and Tasks views and the folders within each view. Click a folder to show the items in the folder.)to keep them visible and easily accessible.
Keep your contact folders visible by keeping their group open or "expanded," or collapse the group to make more space. Click the arrows in the group header to expand and collapse the group.
Step 1: Create a new contact group
1. In the Navigation Pane, right-click the My Contacts group header, and then click New Group.
If you have other groups, you can right-click any group header.2. In the new group header, type a name for the group.
To move groups within the Navigation Pane, right-click the group header and click Move Up in List or Move Down in List.Step 2: Add contact folders to the new group
- In the Navigation Pane, right-click the contact folder, and then do one of the following:
To move the folder, click Move "folder name".
To copy the folder, click Copy "folder name".
No comments:
Post a Comment